Why is Blogging so Challenging? Perhaps, it’s because you don’t have a system to manage blogging tasks.
Blogging is a process with many moving pieces:
- collecting topic ideas
- deciding on the topic for a particular post
- researching the topic
- drafting the post
- uploading and formatting the post
- promotion and sharing
Often times the Manage Blogging task gets broadly recorded on our to-do list as “Write a blog post.”
As a result, we don’t allocate the necessary amount of time for each step of the process which results in articles getting published with delays and are of poor quality.
If you haven’t found a system to consistently create great content, try managing the process using Trello.
The reason Trello is excellent for managing the blogging process is because it takes the ambiguity out of what needs to happen. You now have a board with the steps of the process laid out before you. This allows you to estimate your workload more realistically and, as a result, organize what needs to be done more efficiently.
Trello also makes managing the process very satisfying. You get to physically move the card with the title of each post from one list to the next as the steps are completed. That is incredibly rewarding!
New to Trello?
If you are not familiar with Trello at all, check out this article, where I briefly talked about Trello as a task management system. You can also check out the part about basic Trello features and techniques—that’s pretty much what you’ll need to manage your blogging process too.
Ready?
1. Create Your Trello Board
First and foremost, visualize how the process flows and then list everything that needs to happen for you to get the blog post out.
Most likely, it will be something like this:
- Gather ideas by watching social media, surveying your audience, and reading other content
- Capture ideas that piqued your interest
- Review saved ideas and brainstorm topics
- Map them out on an editorial calendar
- Come up with a headline for the next post
- Create an outline
- Draft your post
- Finalize and proofread it
- Upload your blog post to the website
- Share it with your audience
- Save the links and social media updates for future reference
Now that you can see the flow, you can translate it into a series of lists in a Trello Board. (If you remember, in Trello each category of activities becomes a list. Every new list = a step in the process.)
Create a new board in Trello and give it a name.
Translate the bulleted list above into groups of activities that need to happen. This greatly depends on your process, but you can also start with this example:
- Shortcuts—templates and checklists
- Ideas Vault
- Headline
- First Draft
- Edit
- Final Draft
- Upload
- Approve
- Schedule
- Promote
- Archive
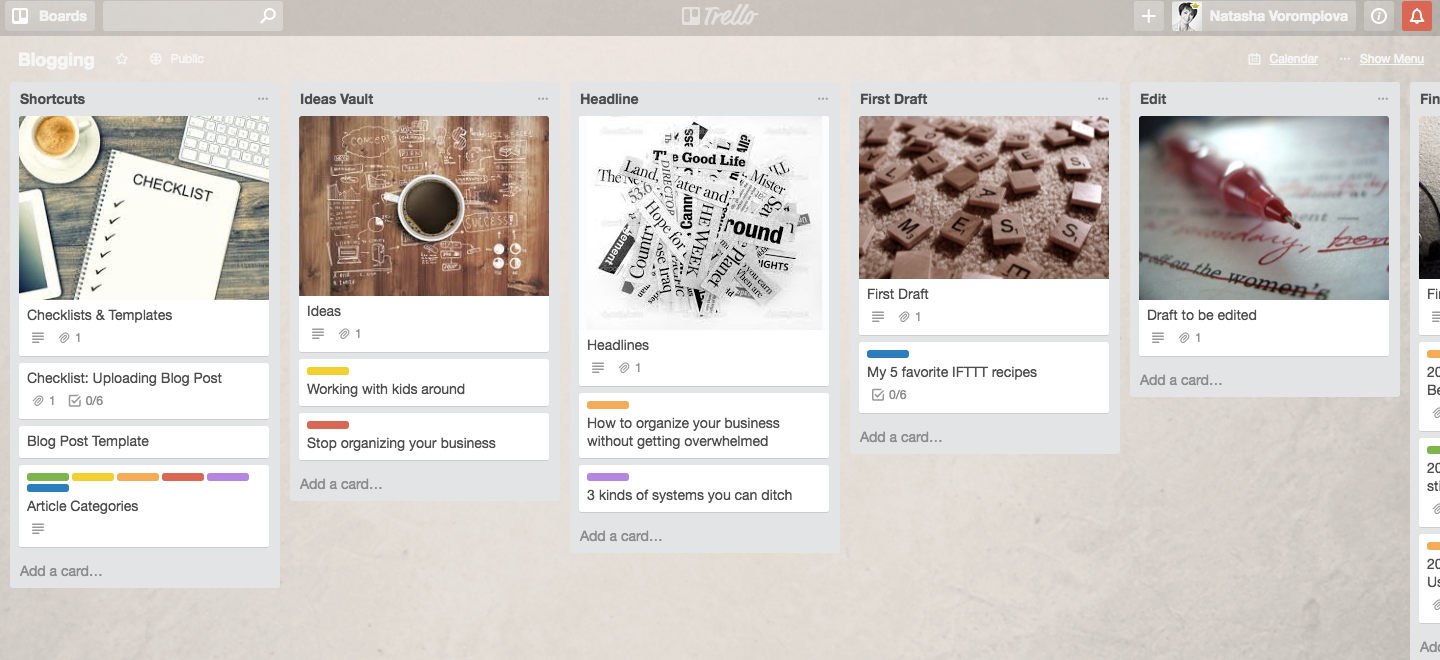
Sample Trello Board
Here is the link to this Board if you want to copy it into your Trello and adjust it to your needs.
2. Turn Trello into an Ideas Vault
You must have a single blog post ideas vault. Otherwise, you’ll be spending more time collecting your thoughts and coming up with topics than actually writing.
For that, identify when and how you get ideas for your blog posts and make sure all of them end up in Trello. For example:
- Add Trello bookmarklet to be able to add to your Trello Blogging Board links to articles you read online:
- Add ‘Add to Trello’ to your Chrome extensions (or download Firefox add-on Web Clipper for Trello)
- Authorize the Trello connection and then
- Specify the Board and the list your blog post ideas will be added to.
Now, every time you come across a blog post or web page that gives you an idea for a blog post, send it to your Trello.
- Get into the habit of jotting down and immediately adding to your Trello Blogging board ideas you get when chatting with clients or prospects.
- Forward into Trello email questions from your readers using Email-to-board email address. To set it up:
- Go to Menu->More->E-mail-to-Board setting
- Specify the list and the position of the cards that will be added to the Board (click on this image and others to enlarge them for easy reading)
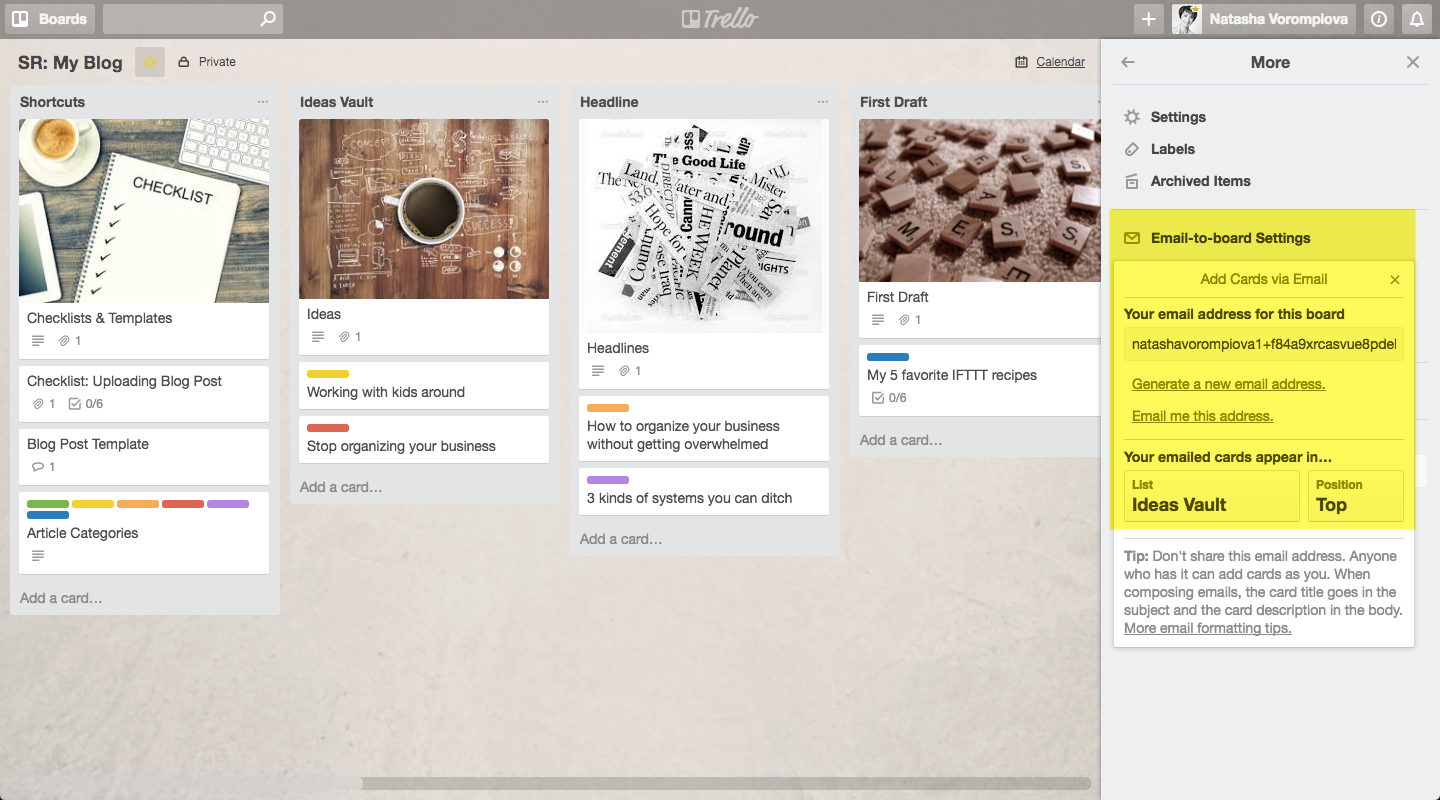
Email-to-board email address
Now, when you get an e-mail with an idea for a blog post, click “Forward,” put your Trello Blogging Board email address and hit “Send.”
- Add Trello app to your mobile device to be able to create Trello cards and even Trello audio notes for yourself on the go.
Here are a few more ideas so you never run out interesting content for your blog.
3. Embrace Constraints
Believe it or not, constraints will help you to be more creative.
For example, would you be more creative if you had to do “A” or “B”?
A. Write:
- 12 blog posts
B. Write 3 each of the following:
- blog posts answering readers’ questions
- inspirational blog posts
- blog posts about tools that make you productive
- how to posts
“A” feels pretty daunting, doesn’t it?
“B”—even with all its constraints—is so much more doable and fun, right?
I bet “A” would take you forever because there are just too many decisions you need to make: what to write about, in what order, how to go about it whereas option “B” gives you clear plan of action. An added benefit to option “B” is that if you post once a week, you now have a content plan for 3 months!
Decide what categories of posts are most interesting for your audience and create a label in Trello for each category:
Go Menu->More->Labels->Create New Label or click on an existing one and edit it.
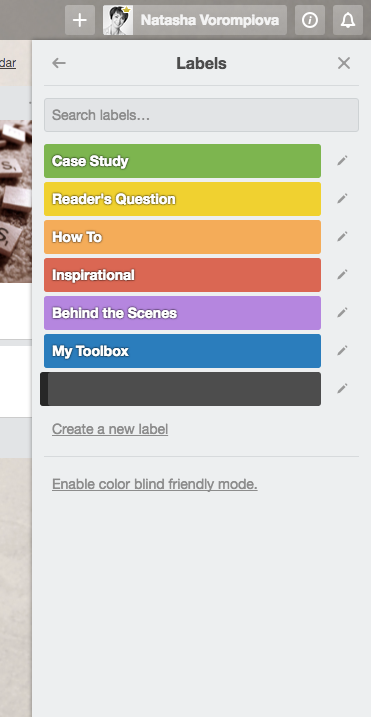
Blog Labels
It will help you decide on the angles of your blog posts that much easier and ensure that you post diverse content. You can see an example of blog labels above.
Bonus points:
Schedule a recurring monthly or quarterly appointment with yourself to sift through the list of your ideas and decide on the topics for the next batch of posts. Then, when you sit down to write a post, you’ll always have your topic cued up before you start.
4. Plan for Freedom
Plan for freedom from activities that you don’t like or need to do by identifying “delegatable” parts of the process.
I strongly recommend you do this even if you don’t have anyone to delegate tasks to just yet.
It is very motivating to realize that you don’t have to do everything yourself. And now that you’ve broken down your process into steps, I’m sure you can isolate the bits that could be done by someone else.
Already have team members that are helping you to create, publish, and/or share your blog content?
Make sure to show them around the Trello Blogging Board. Ask them if you missed anything. Then, decide how you (as a team) can ensure that things don’t fall through the cracks.
[clickToTweet tweet=”Tips & Tricks for Managing Blogging Using Trello http://bit.ly/1Zsc7mF ” quote=”Tips & Tricks for Managing Blogging Using Trello. “]
Here’s an example.
Determine who is responsible for what part(s) of the process.
For this, you don’t need to have a large team. It might be just you and your assistant passing the blog post baton to each other:
- You + your assistant—come up with ideas and put them into the Ideas Vault
- You: Headline
- You: First Draft
- Your Assistant: Edit
- You: Final Draft
- Your Assistant: Upload
- You: Approve
- Your Assistant: Schedule
- You: Promote
- Your Assistant: Archive
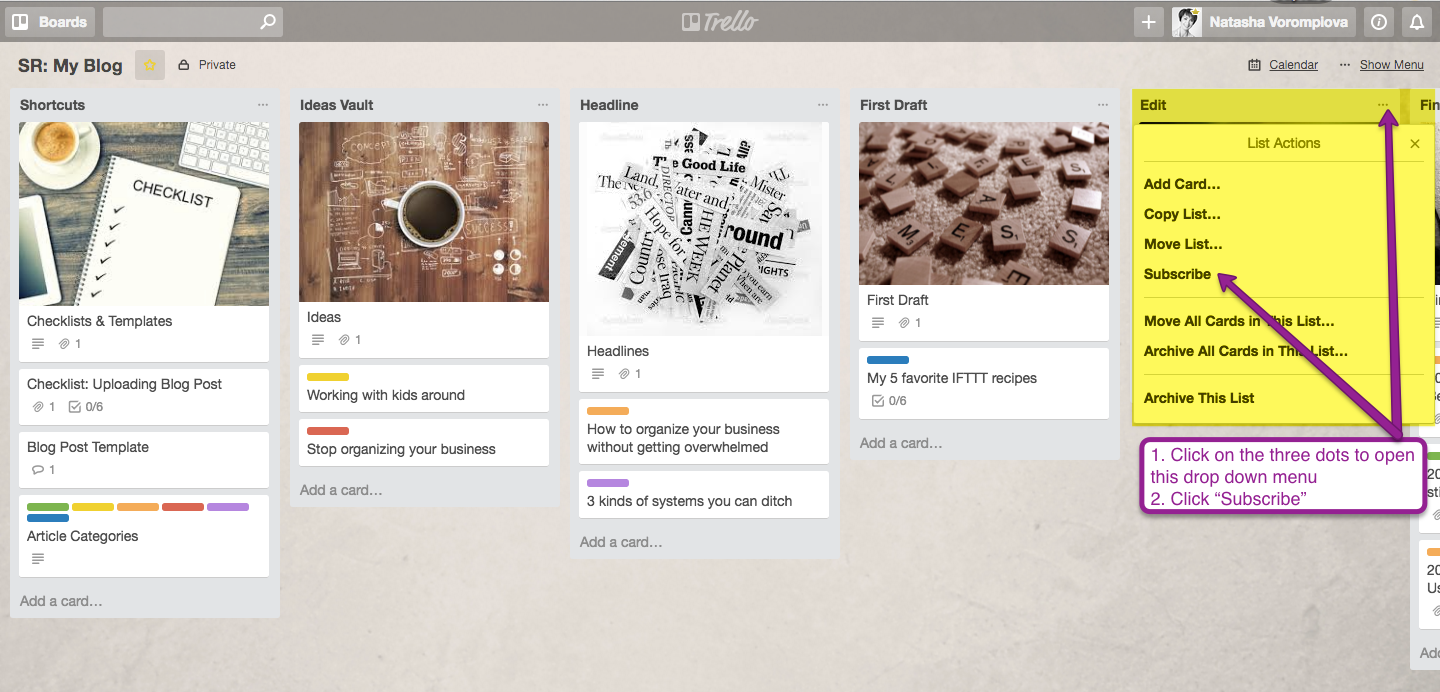
Subscribe to list
Make sure your team member(s) are subscribed to the proper lists in order for them to see what tasks are meant for them.
If you have a team member who proofreads your posts, have them subscribe to the list “Edit.”. This way, when the first draft is ready and you move the card from “First Draft” to “Edit” list, your team member will be notified automatically without your having to email them.
Create a checklist for as many parts of the process as possible, i.e., formatting the blog post, creating shareable images for the post and social media updates, deciding on the ways to share the blog post, etc.
Again, do this even if you are not in the position to delegate just yet. When you are—you’ll have a set of instructions for your new team member ready to go.
In addition to that, creating instructions knowing that you are creating them for a future assistant, will have you approach the task much more responsibly. You will be that much more detailed and thoughtful when adding tasks and attaching the supporting information such as examples or passwords.
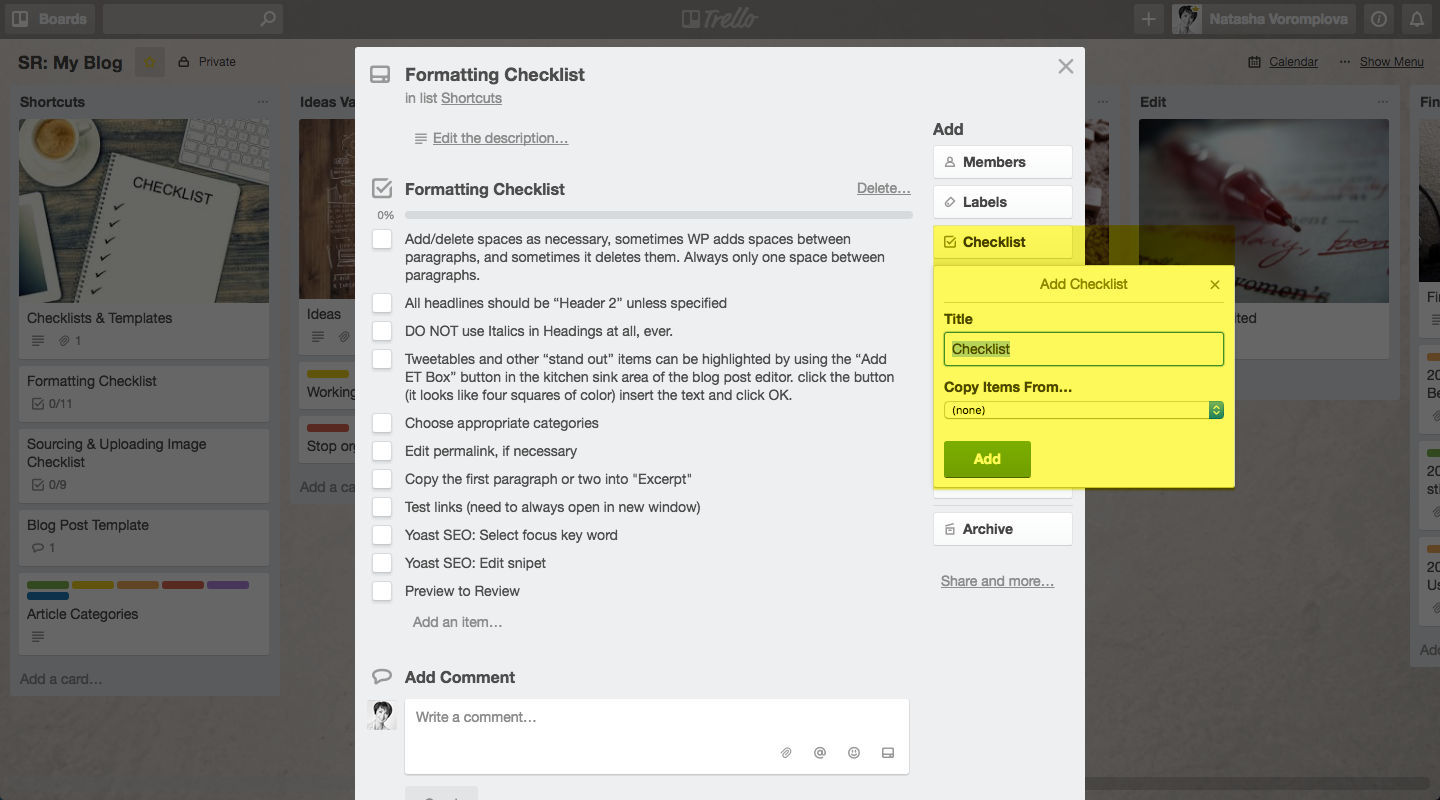
Create checklists
Use the Trello checkbox feature to create your checklists: open a card->click “Checklist”->Title your checklist->click “Add”. You can add your checklist items one by one or, if you already have your checklist as a bulleted list, paste your list into the first checklist item and click “Add”—each one of the items will become a line item of its own
Creating these checklists will help you and your (future) team members to be more efficient instead of trying to keep all those steps in your head.
5. Make it Fun
When you manage blogging, make it as visual as possible:
- Add a fun background. Yes, you need to be on a paid plan to be able to do that, but you can get creative if you don’t want to pay the fee. You can share Trello with someone else, upgrade for free and upload a bunch of backgrounds. Or you can copy another board with a background you like (for example, there is a number of Boards on Trello’s website for inspiration.)
Add feature image
- Add a feature image for each list, like I have here,to be able to quickly spot the list you are looking for
- Use an emoji when providing instructions or chatting with your team members by wrapping the emoji name is colons. Often times, an emoji speaks louder than words.
- Give yourself or your team member Gold Stars. It’s incredibly motivating to get acknowledged for completed tasks. Don’t underestimate this simple way of rewarding yourself or your team members for well-done assignments. To find Trello Gold Stars and other stickers, click Menu->Stickers (Available in Trello Gold and higher)
- Record a fun video showing your team members how to use Trello. For example, when Natalie McGuire introduces her clients to Trello, she uses pictures of her dog to demonstrate how to add images to Trello. For more creative ways to make your Trello collaborators feel comfortable with Trello watch my interview with Natalie.
As you can see, Trello is an amazing tool which will help you not only stop missing blog post publishing dates but make the process super fun.
Back To You
What recommendation are you excited to try?