By Claire Pelletreau
If you’ve ever run Facebook ads for your business, you know that the process of actually getting them running is no walk in the park. You have to worry about the creative, the targeting and the pricing, all while navigating a less-than-friendly interface.
The good news is that a little prep time can make a huge difference when it comes to creating effective campaigns. Getting organized before diving in can help you save lots of time and avoid some serious headaches.
As a Facebook advertising consultant, I use this simple 4-step system every time I create a new ad or campaign. You’re going to have to go through these steps at some point in order to run your campaigns, but it makes more sense to do these four things now so that there’s less room for confusion (and mistakes) later.
Step One: Set up Conversion Tracking
Here’s the truth: you can tackle these steps in any order you like before setting up your next ad campaign. But this step is first for a reason – if you run ads without enabling conversion tracking, you are literally throwing money away.
Each dollar you spend on Facebook ads should go towards a specific outcome: new email subscribers, new clients, new customers. Once you have the conversion tracking set up, Facebook can automatically optimize your campaigns based on those outcomes (which is a feature that makes Facebook advertising pretty awesome). So make sure you get your conversion tracking set up before anything else. Here’s a quick tutorial on getting it done.
The WordPress plugin mentioned in the video is called Facebook Pixel Conversions for WordPress.
Note: if your think you page are set up with Leadpages, click here to learn how to insert your tracking pixel.
Step Two: Identify Your Target Audience
In this step, you’re going to answer the most important question when it comes to creating Facebook ads:
“Who is most likely to become your customer or client after seeing your ad?”
Here are the options under Audience when creating your ad:
- Location: Does your ideal customer live somewhere in particular? In a few specific cities, states or countries?
- Age: How old is he or she? And I’m not talking about the age range of all your clients or customers throughout the history of your business – I mean the majority of them.
- Gender: Do you end up working with more men or women, or is it a truly even split?
- Language: You might have dealt with this by choosing a specific location, but targeting by language (like English) in a geographic area (like Argentina) might allow you to get laser focused with your advertising (if you wanted to target English-speaking expats, for example).
- Other demographics: You can also target people by their relationship status, level of education, fields of study, job titles, industries, ethnic affinity, generation, if they’re parents or not and what age children they have, their political affiliation, and “life events” such as getting engaged, getting married, starting a new job, making a relationship “official” on Facebook, even being in a long-distance relationship. Remember, the more specific you can get with your targeting, the better!
- Interests: Under the Interests category, you can put general things like “yoga” or “cooking,” etc. but I don’t recommend it. Here you should think about competitors or other businesses that have a very similar target audience. Use the Facebook Open Graph Search and search with this phrase: Pages liked by people who like[insert your page name or a competitor’s name]. This will give you a good starting point for finding other businesses that are similar to yours.

- Behaviors: ignore this for now
- Connections: do you want to target your fans, exclude your fans from seeing your ads, and/or target the friends of your fans?

As you can see, those are a ton of options to choose from. Knowing who you want to target before you get started will help you breeze through this section and come out on the other side with the perfect audience.
Step Three: Write Your Ad Copy
This is a simple trick but one that’ll save you time and possibly some embarrassment! Open up a Google Doc, a Word doc or whatever you like to compose things in. In this doc, take about 15 minutes to write out lots of different versions of ad copy for this campaign. Make sure it’s clear, concise and includes a ridiculously specific call-to-action. To give you an example, here’s one of my best-performing sets of ad copy:
Ready to put your list building on autopilot? Grab my FREE guide to growing your list with Facebook ads → clairepells.com/free-guide
Once you’ve got 6 or more sets of ad copy, choose your favorite one. Put it at the top of your document and put the other sets in italics or a different color – anything that will remind you they haven’t been used yet. When it comes time to create the actual ad, you’ll be able to simply copy and paste your ad copy from the doc and move quickly on to the next step. This document will also be useful later on when you want to test out new ad copy in your campaign.
Here’s why it’s so important to write your copy somewhere outside of Facebook’s ads interface: it makes typos and missing or erroneous words WAY easier to catch. Trust me: you do not want to be running ads that have even the smallest error in them. I wish I could say I’ve never done it myself, but there’s a reason I now use Google Docs religiously when writing both my clients’ and my own ad copy.
Step Four: Get Your Images Ready
Ad images are actually a lot easier to create than you think. When I’m not able to outsource them to an inexpensive designer, I use Canva to add text to my own images. You’d be surprised by how well a good selfie can work in a Facebook ad!
One thing you do need to think about ahead of time is the size of any text you include on the image. Facebook has a VERY strict 20% rule, and it doesn’t work exactly the way you’d think it would. Before you add any text to an image, upload the image to the Grid Tool to see where you should be placing your text. Don’t skip this step – if your ad gets disapproved because the text is too big, you’ll have to start from scratch to create your ad.
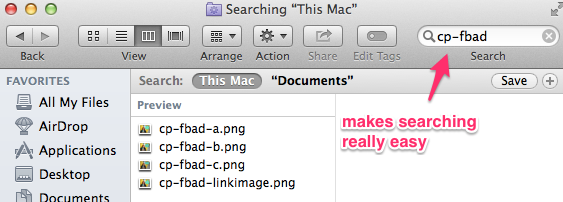
Finally, make sure you save your images with a series of names that will make them easy to find later. I usually name mine something like cp-fbad-a and change the last letter for each image. Then drag all your images to a specific folder so that you have all your ad images in the same place.
Now You’re Ready to Rock and Roll!
Once you’ve got those 4 things knocked off your to-do list, you’re ready to head over to the Ad Manager or the Power Editor and put together your campaign. You’ll see how having these things all set in advance saves you a ton of time on the actual process of creating your ad campaign. It’s more difficult to trip up and make mistakes when you don’t have to worry about all these moving pieces.
Back to you
Facebook ads is a challenging area of marketing with a hefty learning curve. Having a system you can rely on to create the ads is a healthy first step. Let us know if you have more question about your ads, (like why they don’t perform the way you wish, or how to decide on what to focus on) let us know in the comments below, or meet us over on Facebook to talk about campaign strategies that work!
BIO
 Claire Pelletreau is a Facebook ads consultant and confessed conversion junkie. She helps small business owners bring in more subscribers and sales than they ever imagined. Get more bang for your advertising buck – click here to grab Claire’s free step-by-step guide to list building with Facebook ads!

Fantastic post! Thank you so much. This is helping me to get started with Facebook ads. Question — do you ladies have any tips around what type of text to include in the image? Also, I’m finding writing the headline, text and news feed ink description to be tricky. Are there key pieces of info to include with each one? Thanks! 🙂
Hey Megan!
If you’re creating an image for a link post (meaning one with the headline, link description, news feed description, etc.) I don’t necessarily recommend adding text to the image. You can add a short call-to-action that looks like a button – here’s one of my ads where I do that: Guide to List Building
As for the text, this can be tricky, but I recommend being very clear about what you’re offering, avoid any mention of your brand, identify the problem you’re solving and what exactly the solution is. Hope that helps!
Very helpful! Thank you.
You’re welcome Megan!